• About
  • Development
  • Music
  • Photography

Thomas Shellberg

  • I’m Building An App – Step 1 – Files and Data

    May 23rd, 2019

    This is the third post in a series of posts which will illuminate my journey to becoming a Full-Stack JavaScript Developer. Read the first one here.

    Recap

    My plan is to progressively enhance the app into a fully complete app, allowing me to step-by-step learn important principles of development without overwhelming myself while at the same time practice my learning by applying them to a real app.

    App Structure

    I mentioned in the previous post that I’m using React Native to build the app itself along with Firebase as the “backend”. I’ll be following as many best practices as I know for organizing my code and assets:

    /__tests__/ - contains all of my Jest test suites.
    /.expo/ - standard Expo folder.
    /assets/ - static files(images mostly).
    /components/ - the reusable React components that make up the app.
    /constants/ - used for referencing screen dimensions and colors.
    /functions/ - houses Firebase Cloud Functions.
    /navigation/ - the React Navigation components.
    /node_modules/ - all the dependencies of the project.
    /screens/ - the screens which React Navigation uses for navigation.
    

    App.tsx is the main entry point of the app. If the file extension confuses you, I’ll explain what it means in a later post. All you need to know is that it will compile to App.js and will be the “root” file of my app.

    Database Data

    This app will have two major data objects – users and contacts.

    A User represents the person that registers and uses the app. This User will have a number of Contacts assigned to their user profile.

    A Contact represents a single person which contains their contact information.

    The Realtime Database module in Firebase makes this really easy to visualize:

    A visual representation of the data hierarchy in the app.

    Remember, it’s NoSQL

    In contrast to an SQL database’s data being arranged via tables and rows, the app’s database is a NoSQL database(presumably MongoDB). This means that data is not saved as rows but rather documents. To access documents we’ll use Firebase database functions rather than SQL queries which is easier, safer, and lets us write JavaScript instead of SQL.

    What I like as well is that you can visualize your data in a hierarchical way.

    The root of the database has /users/ as the container for the users of the app. Each user has their own uniquely generated ID which Firebase takes care of. Each user has their own /contacts/ and /me/ containers.

    The /contacts/ container holds all of the individual contacts created by a single logged-in user. Each contact also has their own uniquely generated ID created by Firebase. In the screenshot you can see the information saved for each user:

    • Address
    • Birthday
    • Email
    • First Name
    • Last Name
    • Phone Number

    The /me/ container holds the information for the logged-in user. It holds all of the same type of data as a single contact would. This allows for the logged-in user to “share” their own contact data with others(we’ll see this in action later).
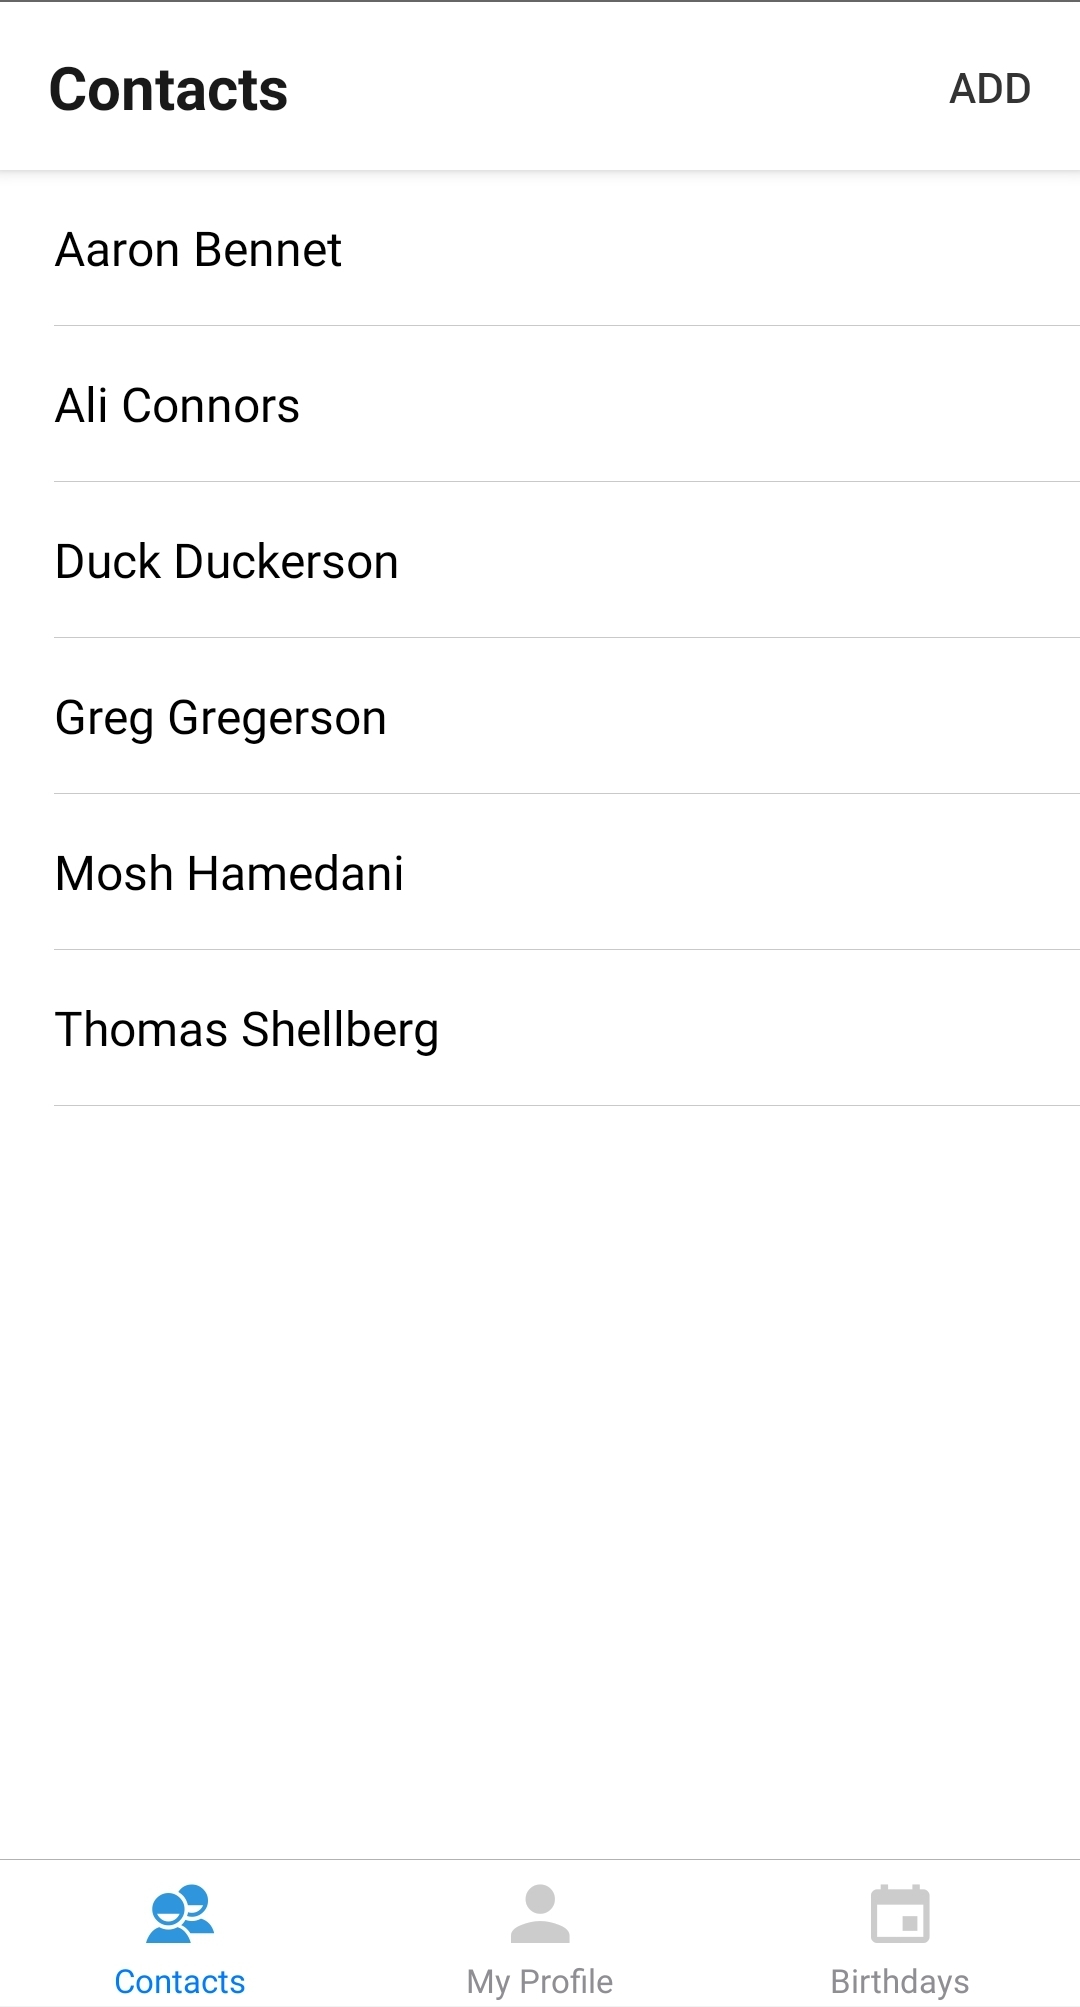
    Viewing Contacts

    When a user logs into the app they are first directed to the Contacts tab, which outputs a list of their contacts. Clicking on a contact brings you to a screen which shows all of the contact details and allows you to edit or share the contact.

    The Data Flow

    The gist of how this works is this:

    • I log into the app and get redirected to the Main TabNavigator using a React Navigation function. The default tab is Contacts which will display a list of the contacts assigned to my user account.
    • When this screen is about to load(using the componentWillMount() lifecycle method) the app calls a Firebase database function to ask for the contacts associated with my Firebase user ID.
    • We await the response(because this is not instantaneous) and then use this.setState() to save the contacts into React State.
    • We have a FlatList React Native component which generates a list based on the contacts data contained in state. Anytime the contacts within state changes, the list is re-rendered automatically.
    • Each contact is represented by a list item within the FlatList component. Each list item has a key which links the list item to a contact.
    • When you tap on a list item a React Navigation function is called to switch to a new screen to show the contact details. The contact details are carried over to the new screen as a prop using the key mentioned above.
    • To reference the contact details in the new screen you can just use this.props.

    That’s the basics of how contacts are loaded and displayed throughout the app:

    • A Firebase user ID is grabbed once logged in.
    • The contacts for that user ID is loaded via a database call.
    • The contacts are stored in state
    • A list is generated and automatically updated based on state.
    • To update the list we just update state.

    In Part Two I’ll discuss how validation and input “hinting” can make the app more enjoyable to use as well as limit mistakes made by users.

  • I’m Building An App – Step 1 – App Overview

    May 21st, 2019

    This is the second post in a series of posts which will illuminate my journey to becoming a Full-Stack JavaScript Developer. Read the first one here.

    Recap

    My plan is to progressively enhance the app into a fully complete app, allowing me to step-by-step learn important principles of development without overwhelming myself while at the same time practice my learning by applying them to a real app.

    Planning

    I mentioned in the previous post that I’ll be using React Native to build the app itself along with Firebase as the “backend”. This type of app is often referred to as a serverless app because it doesn’t require building out a separate server-side app. For example, a common modern app is built with the MERN stack:

    • MongoDB
    • Express.js
    • React/React Native
    • Node.js

    We’ll be cutting out the MEN from this equation and replacing them with an integration with the Firebase platform.

    Development Tools

    I decided to use the Expo CLI library to create this app. When I was first learning React Native I was using the standard react-native-cli library along with Android Studio for phone emulation but Android Studio was quite buggy for me and I had an awful time with debugging.

    Expo logs console messages right in the terminal(doesn’t require a browser window) so that was fine for me for this project. Additionally, I really liked testing my app on a real device. It feels so much more rewarding and “real” as you progress.

    Navigation

    I decided to use React Navigation for navigating through the various screens and tabs of the app. React Navigation was a bit tough for me to grasp at first but the example project that ships with Expo helped a lot.

    The navigation setup is a basic Switch Navigator which contains two other main pieces of navigation: Main and Auth. Each of these are also their own StackNavigators which contain multiple screens.

    Think of a Switch Navigator as just a way to navigate linearly between screens; you view one screen at a time and can switch to another one.

    The Main portion of the app is the area which a logged-in user sees and gets to interact with. This is done with a React Navigation TabNavigator component which contains three different tabs to navigate through the main area of the app.

    The Main StackNavigator generates several tabs for moving around the main portion of the app.

    The Auth portion of the app is the area which a logged-out user sees. It is the default path when entering the app.

    The initial screen when loading the app, prompting a user to login, register, or reset their password.

    I don’t have a great eye for design or UI but this will do for an MVP.

    Next Steps

    Rather than drone on forever I’ll try to keep posts on the shorter side in order to make them more digestible and less boring.

    The next post will discuss the layout and functionality of the app as well as the data it works with. Cheers!

  • I’m Building an App.

    May 20th, 2019

    This is the first post in a series of posts which will illuminate my journey to becoming a Full-Stack JavaScript Developer.

    Why do I want to become a developer?

    It’s always been in my nature to create – I’ve written, produced and recorded music, and built small websites through WordPress for years – I’ve always been a creative person with a love for computers and the Internet. However, for the majority of my life I did not believe these two sides of me had a shared destiny; I did not believe that coding was creative. Now I know that Code is Poetry.

    The Plan

    Build a single, complete mobile app using JavaScript which demonstrates the competence and tenacity required to be a JavaScript Developer.

    My goal is to be hired as a professional JavaScript developer before 2019 is over. I have already spent the first few months of 2019 learning the basics of JavaScript and Web Development, just enough to be able to start building something of my own. Rather than get caught in the infamous “tutorial loop”, that is, jumping from online course to course copying code from an instructor, I’m going to dive in and build a complete project on my own.

    My plan is to progressively enhance the app into a fully complete app, allowing me to step-by-step learn important principles of development without overwhelming myself while at the same time practice my learning by applying them to a real app.

    Why build just one app?

    A lot of junior developers will have multiple projects to list off in their portfolio but will not have anything actually published to one of the app stores. After reading advice from senior developers it’s clear to me that a single, complete, published app tells more about an aspiring developer than several incomplete and unpublished apps.

    After thinking critically about how to approach my JavaScript journey I’ve decided to build a single app and make it as complete as possible, then, publish it for users to download and use.

    How will I do this?

    By building my own app from scratch and progressively enhancing the app, learning and practicing core development concepts essential to becoming a professional developer.

    What is the app?

    The app will be a very simple “contacts manager” app which is designed to help keep all of your contact information in one place – address, phone, email, and birthday.

    I have a terrible time remembering birthdays so I want a way to not only look them up but to be reminded of upcoming birthdays.

    How am I building it?

    The front-end architecture of the app will be created through React Native – an exciting and relatively new JavaScript framework which allows for building native mobile apps entirely using JavaScript.

    The back-end architecture will be done using Firebase – a relatively easy-to-use development platform which can offload some or all of the server-side responsibilities an app would normally need. For this app I’ll be using the following from Firebase:

    • Firebase Auth – user creation, deletion, authentication, credential storage and password reset. This allows me to quickly add login/auth capabilities to my app without building my own totally secure backend server.
    • Realtime Database – storage and retrieval of data without using a separate query language. Realtime Database also has the ability to set access rules(authorization) to make sure that users can only access and modify their own data.

    What are the core steps?

    1. Build the core of the app first. Add all of the necessary features to get the app working and get it to an MVP state.
    2. Spice it up. Add UX improvements such as input validation as well as adding hints to devices when to use specific types of keyboards. For example, when inputting a phone number, use the number keypad instead of the standard keyboard.
    3. Beef up the security. Prevent unauthorized data access/modification as well as prevent injection of unwanted or dangerous data into the app database.
    4. Reduce potential bugs. Allow me to more confidently refactor my code in the future by adding Unit Tests through Jest.
    5. Improve clarity. Help document the intent of functions/components by adding Typescript compiling. Help prevent accidental data mutation by adding static typing to variables, props, and state.
    6. Caching. Help reduce tight coupling to an active internet connection by adding caching for some amount of offline access. This will also speed up performance.
    7. Test performance. Use performance debugging to make sure it is smooth and has a native app feel. If possible, adhere to the 16 ms golden rule.
    8. Document the code. For readability, document the code within the app code itself. For longevity and ease of understanding, create a readme file and include it on GitHub.
    9. Publish. Most importantly, publish the app to an app store and have some people test it. Publish to GitHub.
    10. Feedback. Take feedback from #9 and refactor/fix issues.

    What if I fail?

    That’s not going to happen.

    I will hit snags along the way. I will get stuck trying to fix a tricky bug. I will pull my hair out(what’s left of it, anyway) trying to resolve esoteric NPM errors. But I will not fail. I will not give up.

    These blog posts are additional pressure I need to cross the finish line.

    It’s not a question of

    Can I become a developer?

    It’s a question of

    When will I become a developer?

  • Stranger Things Season 1 Soundtrack Re-imagined

    February 8th, 2017

    Don’t call it a “remix” or a “cover” but rather imagine if the soundtrack to Season 1 of Netflix’s smash hit Stranger Things was re-imagined by a hip-hop producer.

    Most of the songs contain samples from the official soundtrack, but the main theme(track 3) was written, arranged, and produced entirely independently.

  • Stranger Things Main Theme(Re-Imagined)

    August 23rd, 2016

    What if the Stranger Things Main Theme was made by an ATL rap producer? This is what the theme song sounds like “upside down”…

    You can also download the song for free.

←Previous Page
1 2

Proudly powered by WordPress


Loading Comments...
 

    • Follow Following
      • Thomas Shellberg
      • Already have a WordPress.com account? Log in now.
      • Thomas Shellberg
      • Edit Site
      • Follow Following
      • Sign up
      • Log in
      • Report this content
      • View site in Reader
      • Manage subscriptions
      • Collapse this bar